Actions
By default, when a monitor suite finishes, the pass/fail information is included in the spider logs, which would be enough during development but useless when you are monitoring several spiders.
Spidermon allows you to define actions that are ran after the monitors finish. You can define your own actions or use one of the existing built-in actions.
E-mail action
This action relies on Amazon Simple Email Service to send an e-mail after the monitor suite finishes its execution. In this example, an e-mail will be sent when your monitor suite finishes no matter if it passed or failed:
from spidermon.contrib.actions.email.ses import SendSESEmail

class DummyMonitorSuite(MonitorSuite):
    monitors = [
        DummyMonitor,
    ]

    monitors_finished_actions = [
        SendSESEmail,
    ]
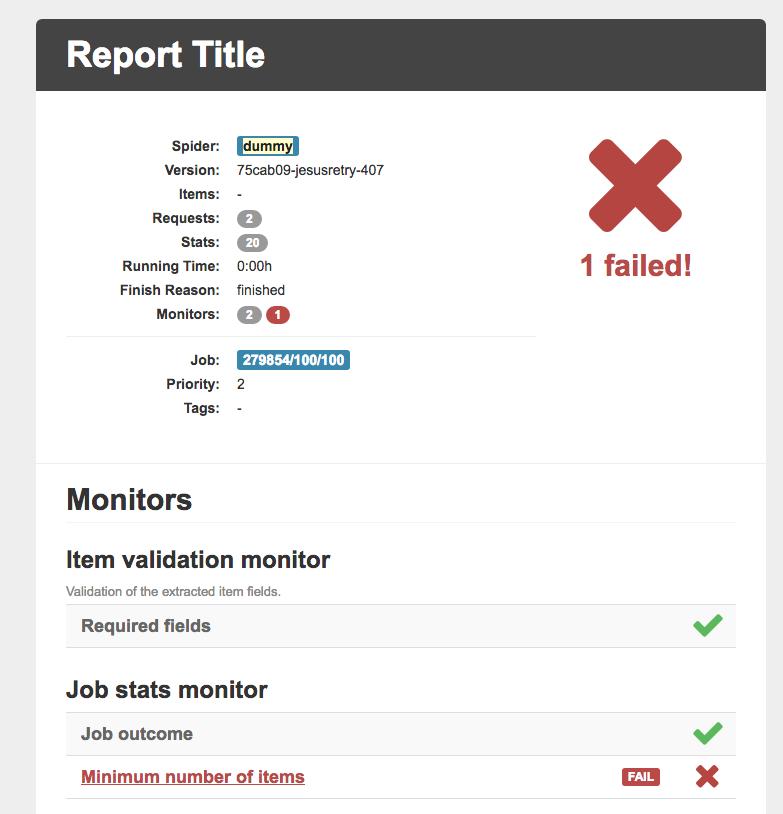
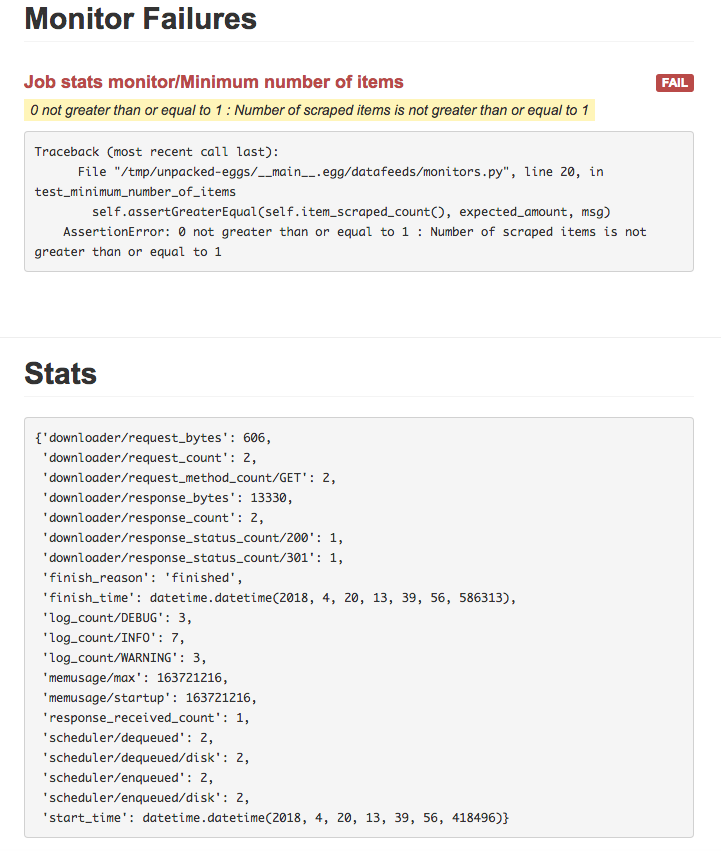
By default, Spidermon uses a HTML template that can be altered in SPIDERMON_BODY_HTML_TEMPLATE setting. You can use Jinja2 as your template engine.
The result of a report generated using this default template may be seen next:
You can also define actions for when your monitors fails or passes also including actions to the lists monitors_passed_actions and monitors_failed_actions.
The following settings are the minimum needed to make this action works:
SPIDERMON_AWS_ACCESS_KEY
Default: None
AWS Access Key.
Warning
This setting has been deprecated in preference of SPIDERMON_AWS_ACCESS_KEY_ID.
SPIDERMON_AWS_SECRET_KEY
Default: None
AWS Secret Key.
Warning
This setting has been deprecated in preference of SPIDERMON_AWS_SECRET_ACCESS_KEY.
SPIDERMON_AWS_ACCESS_KEY_ID
Default: None
AWS Access Key. If not set, it defaults to AWS_ACCESS_KEY_ID (scrapy credentials for AWS S3 storage).
SPIDERMON_AWS_SECRET_ACCESS_KEY
Default: None
AWS Secret Key. If not set, it defaults to AWS_SECRET_ACCESS_KEY (scrapy credentials for AWS S3 storage).
SPIDERMON_EMAIL_TO
Default: None
List of all recipients of the e-mail notification.
The following settings can be used to improve the action:
SPIDERMON_BODY_HTML
Default: None
SPIDERMON_BODY_HTML_TEMPLATE
String containing the location of the Jinja2 template for the Spidermon email report.
Default reports/email/monitors/result.jinja.
SPIDERMON_BODY_TEXT
SPIDERMON_BODY_TEXT_TEMPLATE
SPIDERMON_EMAIL_BCC
Default: None
SPIDERMON_EMAIL_CONTEXT
Default: None
SPIDERMON_EMAIL_CC
Default: None
SPIDERMON_EMAIL_FAKE
Default: False
If set True, the e-mail content will be in the logs but no e-mail will be sent.
SPIDERMON_EMAIL_REPLY_TO
SPIDERMON_EMAIL_SUBJECT
SPIDERMON_EMAIL_SUBJECT_TEMPLATE
Slack action
This action allows you to send custom messages to a Slack channel (or user) using a bot when your monitor suites finish their execution.
To use this action you need to:
Install slackclient 1.3 or higher, but lower than 2.0:
$ pip install "slackclient>=1.3,<2.0"Warning
This action does not work with slackclient 2.0 or later.
Provide the Slack credentials in your
settings.pyfile as follows:
# settings.py
SPIDERMON_SLACK_SENDER_TOKEN = '<SLACK_SENDER_TOKEN>'
SPIDERMON_SLACK_SENDER_NAME = '<SLACK_SENDER_NAME>'
SPIDERMON_SLACK_RECIPIENTS = ['@yourself', '#yourprojectchannel']
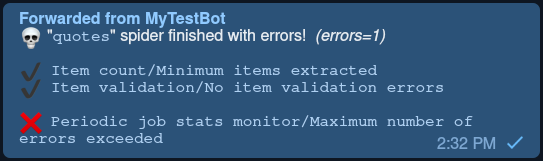
A notification will look like the following one:

Follow these steps to configure your Slack bot.
The following settings are the minimum needed to make this action works:
SPIDERMON_SLACK_RECIPIENTS
List of recipients of the message. It could be a channel or an user.
SPIDERMON_SLACK_SENDER_NAME
Username of your bot.
SPIDERMON_SLACK_SENDER_TOKEN
Bot User OAuth Access Token of your bot.
Warning
Be careful when using bot user tokens in Spidermon. Do not publish bot user tokens in public code repositories.
Other settings available:
SPIDERMON_SLACK_ATTACHMENTS
SPIDERMON_SLACK_ATTACHMENTS_TEMPLATE
SPIDERMON_SLACK_FAKE
Default: False
If set True, the Slack message content will be in the logs but nothing will be sent.
SPIDERMON_SLACK_INCLUDE_ATTACHMENTS
SPIDERMON_SLACK_INCLUDE_MESSAGE
SPIDERMON_SLACK_MESSAGE
SPIDERMON_SLACK_MESSAGE_TEMPLATE
SPIDERMON_SLACK_NOTIFIER_INCLUDE_ERROR_ATTACHMENTS
SPIDERMON_SLACK_NOTIFIER_INCLUDE_OK_ATTACHMENTS
SPIDERMON_SLACK_NOTIFIER_INCLUDE_REPORT_LINK
SPIDERMON_SLACK_NOTIFIER_REPORT_INDEX
Telegram action
This action allows you to send custom messages to a Telegram channel, group or user using a bot when your monitor suites finish their execution.
To use this action you need to provide the Telegram bot token in your settings.py file as follows:
# settings.py
SPIDERMON_TELEGRAM_SENDER_TOKEN = '<TELEGRAM_SENDER_TOKEN>'
SPIDERMON_TELEGRAM_RECIPIENTS = ['chatid', 'groupid' '@channelname']
A notification will look like the following:
Follow these steps to configure your Telegram bot.
The following settings are the minimum needed to make this action work:
SPIDERMON_TELEGRAM_RECIPIENTS
List of recipients of the message. It could be a user id, group id or channel name.
SPIDERMON_TELEGRAM_SENDER_TOKEN
Bot Authorization Token of your bot.
Warning
Be careful when using bot user tokens in Spidermon. Do not publish bot user tokens in public code repositories.
Other settings available:
SPIDERMON_TELEGRAM_FAKE
Default: False
If set True, the Telegram message content will be in the logs but nothing will be sent.
SPIDERMON_TELEGRAM_MESSAGE
The message to be sent, it supports Jinja2 template formatting.
SPIDERMON_TELEGRAM_MESSAGE_TEMPLATE
Path to a Jinja2 template file to format messages sent by the Telegram Action.
Job tags action
If you are running your spider using the Scrapy Cloud you are able to include tags in your jobs. Spidermon includes two actions that may be used to add or to remove tags to your jobs depending on the result of the monitoring.
In this example, considering that you defined a running tag when you start the job in Scrapy Cloud, if the job passes without errors, it will remove this tag. If the job fails the failed tag will be added to the job so you can easily look for failed jobs.
# monitors.py
from spidermon.contrib.actions.jobs.tags import AddJobTags, RemoveJobTags

class DummyMonitorSuite(MonitorSuite):
    monitors = [
        DummyMonitor,
    ]

    monitors_passed_actions = [
        RemoveJobTags,
    ]

    monitors_failed_actions = [
        AddJobTags,
    ]
# settings.py
SPIDERMON_JOB_TAGS_TO_ADD = ['failed', ]
SPIDERMON_JOB_TAGS_TO_REMOVE = ['running', ]
By default we have the following settings when using these two actions:
SPIDERMON_JOB_TAGS_TO_ADD
List of tags to be included when AddJobTags is executed.
SPIDERMON_JOB_TAGS_TO_REMOVE
List of tags to be removed when RemoveJobTags is executed.
If you want to have different rules adding or removing tags for different results of the monitoring, you need to create a custom action class including the name of the setting that will contain the list of tags that will be included in the job:
# monitors.py
from spidermon.contrib.actions.jobs.tags import AddJobTags

class AddJobTagsPassed(AddJobTags):
    tag_settings = 'TAG_TO_ADD_WHEN_PASS'

class AddJobTagsFailed(AddJobTags):
    tag_settings = 'TAG_TO_ADD_WHEN_FAIL'

class DummyMonitorSuite(MonitorSuite):
    monitors = [
        DummyMonitor,
    ]

    monitors_passed_actions = [
        AddJobTagsPassed,
    ]

    monitors_failed_actions = [
        AddJobTagsFailed,
    ]
# settings.py
TAG_TO_ADD_WHEN_PASS = ['passed', ]
TAG_TO_ADD_WHEN_FAIL = ['failed', ]
File Report action
This action allows to create a file report based on a template. As E-mail action you can use Jinja2 as your template engine.
In this example we will create a file called my_report.html when the monitor suite finishes:
# monitors.py
from spidermon.contrib.actions.reports.files import CreateFileReport

class DummyMonitorSuite(MonitorSuite):
    monitors = [
        DummyMonitor,
    ]

    monitors_finished_actions = [
        CreateFileReport,
    ]
# settings.py
SPIDERMON_REPORT_TEMPLATE = 'reports/email/monitors/result.jinja'
SPIDERMON_REPORT_CONTEXT = {
    'report_title': 'Spidermon File Report'
}
SPIDERMON_REPORT_FILENAME = 'my_report.html'
Settings available:
SPIDERMON_REPORT_CONTEXT
Dictionary containing context variables to be included in your report.
SPIDERMON_REPORT_FILENAME
String containing the path of the generated report file.
SPIDERMON_REPORT_TEMPLATE
String containing the location of the template for the file report.
S3 Report action
This action works exactly like File Report action but instead of saving the generated report locally, it uploads it to a S3 Amazon Bucket.
Settings available:
SPIDERMON_REPORT_S3_BUCKET
SPIDERMON_REPORT_S3_CONTENT_TYPE
SPIDERMON_REPORT_S3_FILENAME
SPIDERMON_REPORT_S3_MAKE_PUBLIC
SPIDERMON_REPORT_S3_REGION_ENDPOINT
Sentry action
This action allows you to send custom messages to Sentry when your monitor suites finish their execution. To use this action you need to provide the Sentry DSN in your settings.py file as follows:
# settings.py
SPIDERMON_SENTRY_DSN = '<SENTRY_DSN_URL>'
SPIDERMON_SENTRY_PROJECT_NAME = '<PROJECT_NAME>'
SPIDERMON_SENTRY_ENVIRONMENT_TYPE = '<ENVIRONMENT_TYPE>'
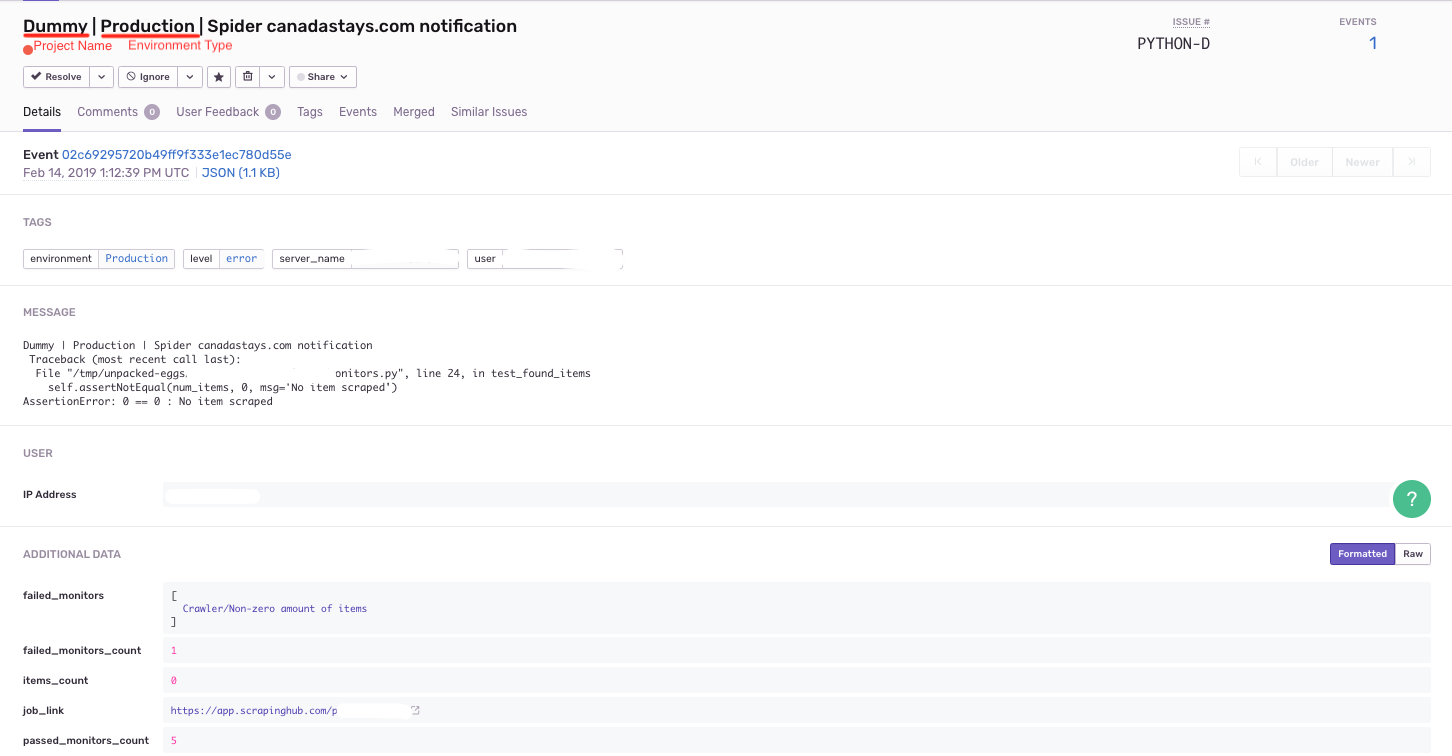
A notification on Sentry will look like the following one:
The following settings are needed to make this action workable:
SPIDERMON_SENTRY_DSN
Data Source Name provided by Sentry, it’s a representation of the configuration required by the Sentry SDKs.
SPIDERMON_SENTRY_PROJECT_NAME
Project name to use in notification title.
SPIDERMON_SENTRY_ENVIRONMENT_TYPE
Default: Development
Environment type to use in notification title. It could be set to anything like local, staging, development or production.
SPIDERMON_SENTRY_LOG_LEVEL
Default: error
It could be set to any level provided by Sentry Log Level
SPIDERMON_SENTRY_FAKE
Default: False
If set True, the Sentry message will be in the logs but nothing will be sent.
Custom actions
You can define your own custom actions to be executed by your monitor suites. Just create a class that inherits from spidermon.core.actions.Action and implement the run_action method.
from spidermon.core.actions import Action

class MyCustomAction(Action):
    def run_action(self):
        # Include here the logic of your action
        # (...)